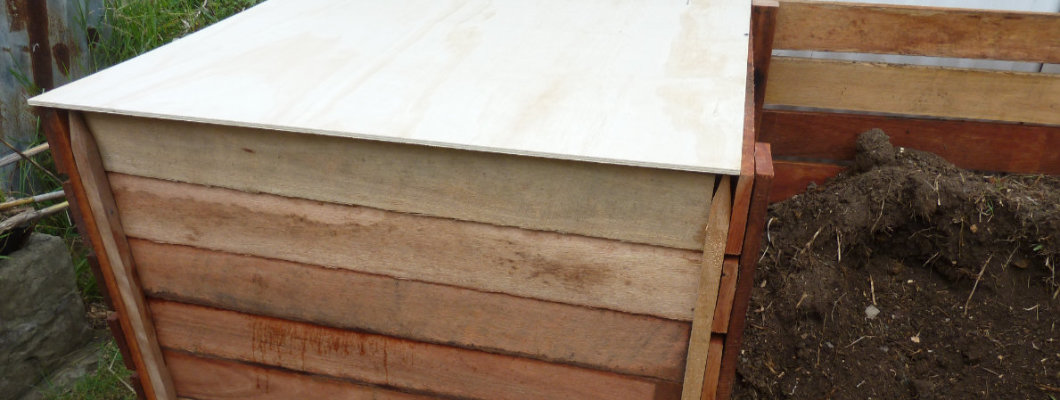
Title image above is copyright © Optimate Group Pty Ltd
(This article was originally published 26th October 2020 here on our Jujube Tree Nursery site.)
First published here 6th July 2022.
Composting is an age-old technique of converting waste organic matter into nutrient-rich soil amendments that add fertility to a soil. There is the slow method of ‘cold’ composting, and then there is the faster ‘hot’ composting technique.
‘Cold’ Composting
‘Cold’ composting is the method pretty much everyone gravitates to by default. This is where a bunch of food scraps and garden waste — of all sizes from bean tips to tree branches — are dumped in a corner somewhere and left to slowly decompose over months and even years. It’s easy and doesn’t requires much effort, but is grossly inefficient. And yes, this is how we did it for years ourselves!
Truth be told, we did it this way because we didn’t really need to generate compost and weren’t motivated enough to think too much about it. It just made us feel good to ‘do our bit’ — who else cringes at the thought of sending food scraps to landfill? But one day some time ago we woke up, became somewhat tired of these piles about the place, not doing much (though the stuff at the bottom of each pile and hard to get to sure looked good!), and figured that surely there has to be a faster way? And yes, there is: ‘hot’ composting. We’ve been doing it ever since and can’t make enough of it! Let’s explore this now.
‘Hot’ Composting
More savvy and less lazy (!) people were probably practising some form of ‘hot’ composting forever, long before this technique was formally described or had a name. ‘Hot’ composting is also known as ‘the Berkeley Method’, but neither of those terms were used by the person who did describe this technique, Robert D. Raabe. Raabe, Professor Emeritus of Plant Pathology at UC Berkeley, California, called it The Rapid Composting Method.
It really is one of those ingenious, head-slappingly-so-obvious concepts that you wonder how you lived without it so long! Raabe’s technique is so effective as it is essentially microbial degradation on steroids. You can read about his method here — it’s an easy three-page read — but I’ll also be referring to it below as well as adding additional background from a microbial point of view.
‘The Berkeley Method’ needs five essential components to function: as stated by Raabe, these are all equally important and thus it doesn’t matter in which order these are listed. But for ease of reference I’ll cover these in the same order below as he does.
1. Material Size
Material will compost quickest if no larger than 4 cm long (from the paper: between 0.5″ and 1.5″, or 1.3 and 3.8 cm). The smaller the better for more woody pieces, as this not only exposes significantly more surface area for microbial attack, it also makes more available the relatively softer inner tissue which is easier to break down. We use a shredder to turn branches into small flat chips that break down beautifully in our piles.
(This post illustrates how quickly surface area increases when a cube is broken into smaller and smaller cubes with the same collective volume.)
More soft/moist material such as food scraps don’t need to be as small, as they are very easily broken down as they are. There’s no benefit manually shredding large, flat material such as cabbage leaves, but I speak from experience when saying that chopping up thicker soft material (eg green vines or herbaceous plants gone to seed) with a pair of secateurs while standing over the pile is well worth the effort — and it’s a good hand-strengthening exercise too, as alluded to in the article!
2. Carbon to Nitrogen (C:N) Ratio
The carbon to nitrogen ratio, also written as the C:N ratio, was mentioned in this earlier post about nitrogen drawdown. All microbes need a carbon source to build the carbohydrates, lipids, proteins and DNA they need to grow and reproduce. But protein and DNA production also require nitrogen. Carbon cannot be utilised if nitrogen is unavailable, and nitrogen thus becomes a limiting factor in the ability to grow and reproduce.
High carbon materials are called ‘browns’ in the composting world, and high nitrogen materials are called ‘greens’. This is a nod to their colour being a good indicator as to what is contained, as ‘browns’ do include high-carbon items such as cardboard, wood chip, paper, bark, straw, dead dry leaves, and dead dry grass, while ‘greens’ include high-nitrogen items such as food scraps, fresh leaves, fresh grass clippings and herbaceous weeds and stems. This isn’t always the case though, as tea leaves, coffee grounds and fresh manures are also ‘greens’.
Decomposition is most efficient when there are about 25-30 parts of carbon for every part of nitrogen, that is, when there is a C:N ratio of 25-30:1. Decomposition slows if the amount of carbon is higher, as microbes run out of nitrogen and die or enter dormancy. This is why those cold compost piles are, well, cold — there’s plenty of dry dead wood (carbon) hanging around but no nitrogen left to decompose it further, as the food scraps, lawn clippings and fresh leaves that were a nitrogen source were long used up. (The largish pieces such piles are prone to contain is another factor.) Topping up the pile with a fresh batch of ‘greens’ kick-starts a bit more decomposition, which again slows once that nitrogen source is used up. Rinse and repeat, and this is why it takes months or years for the pile to completely convert to true compost.
If there is less carbon (more nitrogen comparatively), excess nitrogen may vent as pungent ammonia gas, and the pile is likely to be a bit on the slimey side — such as what develops at the bottom of an infrequently-emptied kitchen food scrap bin! (This is because such materials compact very easily, creating a low-oxygen environment in which certain food-degrading microbes such as Lactobacillus sp. thrive. The ‘slime’ is more accurately called a biofilm, and is a visible sign of microbial growth.)
The 30 to 1 ratio does not mean 30 parts ‘browns’ to one part ‘greens’. It means 30 parts carbon to one part nitrogen. This complicates things somewhat if you don’t have access to scientific equipment that can measure these for you! But a good rule of thumb is one or two parts browns to one part greens — and to gain experience by jumping right in and just doing it! Rather than overthink it, just add one to two times as much dry leaves and twigs, say, for every amount of lawn clippings or food scraps. You will soon develop a good eye and get better with practice, and will know when to adjust for the materials to hand. If decomposition slows, add more ‘greens’ to compensate. If your pile is slimey and/or smells unpleasant, add more ‘browns’ to compensate.
Meeting this ratio can be problematic during colder months when there isn’t as much green material, and during warmer months when there isn’t as much brown material.
Even in our very mild Wollongong climate the grass doesn’t grow much over winter, so I compensate by adding evergreen plant materials such as Pandorea jasminoides prunings (disclosure: link goes to one of our businesses). Adding large amounts of tea leaves or coffee grounds works well too. Fresh manures certainly pack a nitrogenous punch, and those so inclined may wish to add urea — I shall leave ‘how’ as an exercise for the reader!
We have used shredded cardboard as a source of ‘browns’ to good effect too. Large containers of ‘browns’ such as dry leaves and shredded branches can be held in reserve for when needed.
There's no ‘right’ way to add ‘greens’ and ‘browns’. Some people alternate layers, some people mix them together. (I strongly recommend mixing lawn clippings in though, otherwise they mat into a thick layer and create a slow-to-break down anaerobic microenvironment.)
Some people additionally place high-nitrogen ‘compost activators’ such as comfrey, manure or urine in the middle for a jump-start boost. Some people inoculate the centre of the pile with finished compost from the previous batch. I add dead rats when available (a great phosphorus and calcium addition!). All work so long as that all-important ratio of 25-30:1 is adhered to.
3. Moisture
As with the C:N ratio, this is another factor you develop a feel for with practice. While water is the one thing essential for all life as we know it, both too-wet and too-dry conditions will still slow decomposition down.
A too-wet pile displaces oxygen and creates an anaerobic (oxygen-less) environment. Anaerobic respiration is less-efficient and less energetic than aerobic respiration, and anaerobic decomposition is slower than aerobic decomposition accordingly.
A too-dry pile also slows decomposition, not only because there is less water available for organisms to maintain life, but also because there is less water available to act as a solvent in which degradation reactions can take place. (Many reactions take place externally to the microbial cells, but these still need a solvent in which to occur.)
Not-too-wet and not-too-dry, or about 50% moist, will provide the best amount of wetness — but this will usually already be in place with a well set-up bin, I’ve found, as the ‘greens’ naturally contain water. A covered pile both minimises evaporation losses and prevents saturation from the rain. Any piles looking a little on the dry side can easily be wetted with a hose.
4. Heat
Heat speeds up chemical and biochemical reactions, and this is where the ‘hot’ in hot composting comes in. A compost bin about 1 m3 (or 3 cubic feet) minimum is needed to make a hot environment possible, and preferably a bin enclosed on all four sides and with a lid. The centre of this volume will be the most insulated from external temperatures, and become the location at which biodegradation is greatest. This stable temperature encourages the growth of mesophilic (‘middle [temperature]-loving’) bacteria, those which thrive within a moderate temperature range of 20-45 °C (68-113 °F).
The more biodegradation, the more microbes are growing, reproducing and respiring. This respiration is the source of heat which encourages more growth and reproduction in a positive feedback loop.
The temperature at the middle of an enclosed bin stocked with material in a C:N ratio of about 30:1 will easily rise to 71 °C (160 °F) in days, which is too hot for mesophiles, but just right for thermophiles [‘heat-loving’] which like it hot, from 41-122 °C (106-252 °F). Many pathogens and weed seeds are also destroyed at these high temperatures.
Common thermophiles in soil include the Actinomycetaceae family of bacteria, which are responsible for the earthy smell synonymous with soil. These thermophiles readily decompose the tougher components of plant matter such as lignin and cellulose, as well as the chitin of insect exoskeletons. These organisms are facultative anaerobes, able to live in aerobic and anaerobic conditions. If the centre of the pile becomes anaerobic as well as hot, not only do the mesophiles die off, but the anaerobic conditions lead to slower respiration rates amongst the thermophiles, which leads to slower decomposition rates.
The net result is a drop in temperature and a cooling pile.
A happy balance needs to be struck between the mesophiles, which are rapid decomposers at moderate temperatures in the presence of oxygen, and the thermophiles, which are able to break down the tougher materials at high temperatures in the absence of oxygen. Enter the next important component: turning the pile often.
5. Frequent Turning of the Pile
If a pile cools prematurely you must start over by adding fresh ‘greens’ and waiting for the centre to heat up again. This can be avoided by turning the pile frequently from the beginning. This not only redistributes the heat, but redistributes microbial colonies and aerates the pile at the same time — wetting the top of the pile, if dried out, just prior to turning it is also a good way to redistribute moisture more evenly too.
The pile should be turned such that all inner material ends up on the outside and all outside material moves to the inside. The inner material is the most decomposed, and will have good colonies of microbes present to carry on further decomposition, albeit at a slower rate, after redistribution through the pile. The outer material, which has probably not shown much breakdown at all, by being brought to the middle of the pile soon initiates a new build-up of heat and a new centre of bioactivity.
‘Turning’ can be easier said than done. This is where it really pays to have all material in small pieces from the outset — ask me how I know how multi-stemmed herbaceous parsley plants over a metre tall get caught in the pitchfork over and over! (Cue the standing over a bin with secateurs in hand scene mentioned above…)
At least one side of the bin being comprised of removable slats or panels is also highly recommended. (Slats/panels with spacings for air-flow are better still.) And if you have one bin, and have room for more, absolutely have those in place too, as they become really handy as both a repository for the pile turnings as well as a storage bin for finished compost.
When a bin of about 1 m3 (or 3 cubic feet) minimum is filled in one go with materials in a carbon:nitrogen ratio of 25-30:1, it will heat surprisingly quickly. You should be able to feel this warmth in just a day or two of setting it up by digging a little hole and sticking your hand in — this is always a very reassuring and encouraging feeling!
But don’t disturb it any more than this. Wait until day five to turn it over. (I’ll never forget the first time we patiently counted down the days, and the excitement we felt seeing hot steam rise from the middle of the pile!)
Allowing the pile to incubate for five days enables a temperature gradient to become established, from a very hot core to much cooler extremities at surrounding air temperature. And this temperature gradient in turn builds the numbers of both the mesophiles and thermophiles needed to decompose the materials completely.
Yes, the original mesophiles at the centre of the pile would have been killed by the high temperature at the core their own respiration created, but this high temperature stimulated the thermophilic activity needed to break down the tougher woodier materials. Meanwhile, other mesophilic colonies were stimulated to grow in the still warm, but more moderate temperatures further from the core and along the temperature gradient.
Letting the pile incubate much longer runs the risk of too high temperatures developing and anaerobic thermophile populations climbing, which will wipe out the mesophiles and create slower decomposing conditions. Turning at this point redistributes the heat, the microbes, and the components ready to heat up again — only this time around its a faster process as more conducive conditions for decomposition are now in place. The pile can be turned every day or two after that first turn, whether in the one bin, or with the help of a second (empty) bin alongside.
Regular turning this way ensures all parts of the pile eventually become exposed to the region of highest temperature, the core. Regular turning also aerates the pile and ensures anaerobic thermophiles don’t take over — seeing whitish cobweb-like strands throughout your pile means that they already have, and that your pile has become anaerobic, but these will disappear on more turning and aeration. The thermophiles will still be present, just not in such dominating numbers.
The mesophiles will continue to thrive in other regions of the pile where temperatures are favourable and partially-decomposed material is easier to decompose further.
The overall temperature of the pile will drop as decomposition nears completion and microbial activity slows overall. At some point two to three weeks from first starting, the pile will have reduced in volume and with no more heat generation. It will have a rich earthy smell, no longer contain any recognisable material, and be a dark brown to black colour. You may even see earthworms — a sure sign it’s nutrient-rich and cool.
Congratulations, for you now have compost!
Materials to Avoid
Definitely don’t add soil! Maybe a little sprinkling as an inoculum at the start, but really, the ‘greens’ and ‘browns’ you build the pile with will already have the microbes needed. I made the mistake of adding soil once, and never again. It doesn’t contain enough carbon or nitrogen to do much, and is a really good way to knock that pile out cold. And as Raabe said, it does add weight and makes turning the pile a most unpleasant experience.
Also don’t add wood ash as this doesn’t decompose, and will probably raise the pH to an unwanted level as well.
And avoid the manures of carnivores just to be on the safe side — stick to those of herbivores. If we’re naturally repulsed by dog and cat faeces, but have no problem with that of horses, cattle, etc, there may be strong instinctive reasons for this. (Says the person who doesn’t think twice about chucking a dead rat in there mind you…)
Storage
It is very important to always keep compost covered, as rain will leach nutrients out of it.
Useage
Compost can be dug directly into any soil to enrich it, but is especially beneficial for building up really poor, sandy soils that don’t contain much organic matter.
Compost can also be spread on top of the soil and under mulch to allow rainfall, earthworms, insects and microbes to incorporate it slowly over time. This method adds to the soil’s chemical and biological fertility without disturbing the underlying physical fertility that takes time to develop.
It can be added to potting mixes, or on top of already potted plants, and of course is an excellent medium to top raised vegetable beds with.
There are plenty of uses for good quality compost, and this ‘hot’ method is indeed a most efficient way of making it at a rate you may never have thought possible!







Leave a Comment